Now that I have gotten everything taped, mudded and sanded, with a couple coats of prime. Its time to put the final coat of prime on the walls, and if its dries by this evening, maybe I'll paint the walls also.
Tonight I will be purchasing the moldings and doors, and will need to paint those also before I put them up.
Pictures are to come in next post.
Tuesday, April 27, 2010
Tuesday, April 20, 2010
Wax On, Wax Off
As I stated in the last post I needed to get new doors, well my wife could not go with me to Lowes to pick out the door because Sarah was still sleeping, so i told Her I would get the best slider I could find that was for a reasonable price. Well I surprised my wife with a set of french doors which she has fallen in love with. As shown below.

So this week was tape and mud week. Basically going over every screw, and every crease I could find with mud (aka spackle). The one thing I learned when I was putting up the drywall is that you will notice on the edges that they are thinner than the rest of the sheet. So that when you butt two sheets up together, you know where to place the tape and mudd that area, so that its nice and smooth afterwards. Of course you have to keep this in mind when putting up sheet rock, when you cutting edges to fit at different ends of the walls or what have ya.
Here are some pics of the work we got done this past week.


And the last picture is to show some of the mud that was sanded off before laying a second coat of mud, and to make sure we didn't miss any corners (which somehow we always do, but oh well)

So whats next after we get all this done?

So this week was tape and mud week. Basically going over every screw, and every crease I could find with mud (aka spackle). The one thing I learned when I was putting up the drywall is that you will notice on the edges that they are thinner than the rest of the sheet. So that when you butt two sheets up together, you know where to place the tape and mudd that area, so that its nice and smooth afterwards. Of course you have to keep this in mind when putting up sheet rock, when you cutting edges to fit at different ends of the walls or what have ya.
Here are some pics of the work we got done this past week.


And the last picture is to show some of the mud that was sanded off before laying a second coat of mud, and to make sure we didn't miss any corners (which somehow we always do, but oh well)
Today I am planning on putting the second coat of mud and Sanding down what we have, then prime and seal the drywall. What this will do is show us our imperfections. We can then go back and spackle where we need to, then again prime those areas, then we are ready to paint.
I have decided to go with Elegant white, which is an off-white color. Then for the moldings and the three doors I will paint them pure-white. This should look nice. When I take pictures tonight, things should look alot different.

So whats next after we get all this done?
Well I still need to put up the grid for my drop ceiling, moldings, doors, electricity, and then floors i believe. Im hoping to have this all done very soon. Depends on how much time I will have, and apparently i (not by my own will) I will have some time off from work :/.
Of course I need to get this all done before my kid arrives also, because then my time will be drained completely.
Sunday, April 11, 2010
Can you see the light at the end of the tunnel yet?
Sorry for this late post, I have been recovering from a really long Friday, which of which I have completed 95% of the drywalling details. As I started out drywalling the kids playroom,I learned pretty quickly that you want to start drywalling where you start the framing, that is to say, if you frame the walls left to right, then drywall left to right. Because if you start at the opposite end, there will be a large chance that your drywall wont line up. Though there are still possibilities that if you start from the same side, the studs wont line up because they are bowing, or when you put them up, they were off a little. Either way, you can put up what boards that are called nailers. A Nailer is used for not support of any kind except that you can screw your drywall into if needed. As I went through this process Friday, I had most nailers up predicting where I would need them for the drywall, but there were a few that I missed, mainly because of inexperience on my part.
Now for the pictures:
This first picture is of the kids playroom, without the bulk head being done. But you will find later that i did get it done eventually, just not at first. Enjoy...
 Here I got that bulkhead complete.
Here is the door of the kids playroom looking into the storage room. What I learned on this, wall, was that you keep on drywalling as normal past the door, and then once the drywall is hung, from the opposite side of the door, you cut out the frame as shown below...

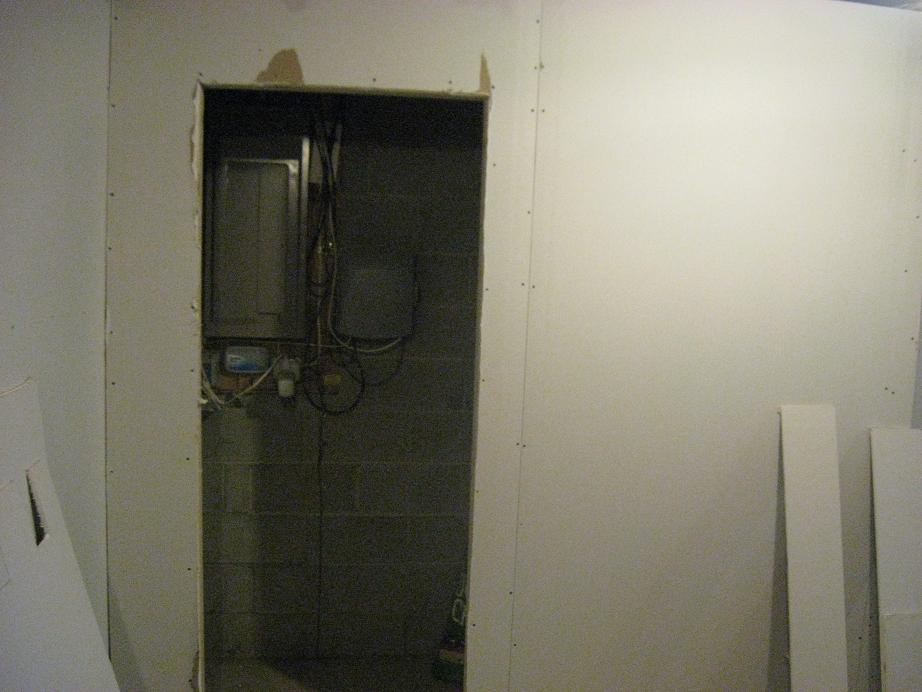
Here is the Utility Closet
 And the wall next to the utilitiy closet
 Here is a picture standing next to the sliding door looking in. As you can see on the far left wall, at the end, that I put a light switch there. I will have that junctioned into recessed lights for the room.
 Here is the other door looking into the storage room.
 Because I haven't replaced the sliding door, I decided not to drywall this last section.
 Here is the last bulkhead, which is partially finished, due to it was getting late (started at 7am, and it was already 5:30pm) and also I am still trying to figure out what to do with that pole. Been going back and forth about either boxing it, or wrapping it.
So whats next?
Well Monday, my wife Susann and I are going to go pick out a door, then hoping on Saturday to take out, and put in new door. You obviously want to do that all in one day, so that is why i am picking up the door on Monday, so it doesn't take away time from Saturday to get this project done.
I am also thinking of starting the tapping , mudding and sanding of the drywalls. That will be the most painful and tedious task left to do.
Once I get that done, I will be doing the drop ceiling. Once the rails are strung up, I will complete the recessed lighting to the rooms, and have the power plugged in for the outlets that I ran and the lights.
Wednesday, April 7, 2010
Stay on target... Stay on TARGET!!!!!!
Today I stayed home from work to get some basement work done. And boy I think it payed off. First we had to work on the two remaining bulkheads. Basically around the Poop pipe as shown here in the first two pictures, an the other in the third pic down. They actually went alot quicker than I thought, and I was able to do some pullups on them, so I know they are sturdy enough put drywall them.


YES!!! I now got all the framing done that I can see. I also put enough nailer boards in that when it comes time to drywalling, it should be pretty easy. Well, not easy, but easier than without them.
Now I was also able to run down to Home Depot and grab 250 dollars worth of insulation. I grabbed both R-13 Insulation for the 2x4s as shown in the first pic here and for the 2x6s I got the R-19 grade Insulation. Now my mother warned me about China built insulation, because of some poor quality grade insulation that was supposedly cheap, so I tried to make sure it wasn't. Happy Mom?
So the next few pictures is of the insulation of the walls. With the insulation, its a alot easier to vision and feel what the basement will be.
Also a key note is, Insulation was WAY easier than i thought to install, just stuff it in there. I have a staple gun that I will use to staple the inner wall insulation, i just need to get the staples for it. But other than that, i am now ready to drywall my basement!!!! YES!!!!!!


Monday, April 5, 2010
little is more than none
This Easter weekend I was able to get 4 more outlets run, and I am to a point where I can start drywalling both the kids playroom and my recreational room. Wednesday I am setup to finish the bulkheads, and hoping by this saturday I can start stapling up the insulation.
I think the only other thing I might be doing before drywalling, is running a line for a baseboard heater. Other than that, I think all that is left is the following:
I think the only other thing I might be doing before drywalling, is running a line for a baseboard heater. Other than that, I think all that is left is the following:
- Insulation
- Drywall
- Taping
- Muding
- Sanding
- Painting
- run the rails for the drop ceiling (alot easier than drywalling the ceiling for now)
- and of course the flooring.
The biggest pain I foresee is steps 2-5, and 7 everything else should be pretty easy and standard. We will see.
Subscribe to:
Posts (Atom)